
Overview
Project-level risks are uncertainties that may affect the successful delivery of a project. These risks can relate to scope, schedule, resources, technology, performance, and external factors.
Risk Management Studio within the Project Canvas allows you to proactively identify, document, and track these risks to reduce their impact and improve project outcomes.
Understanding the ROAM framework
The ROAM framework helps you categorize and track risks based on how they are handled:
| ROAM Status | Meaning |
|---|---|
| Resolved | The risk is no longer a threat and requires no further action. |
| Owned | The risk is active and has been assigned to a person or team for ongoing management. |
| Accepted | The risk cannot be mitigated and must be accepted; plans are in place to address its impact. |
| Mitigated | A strategy is in place to reduce the likelihood or severity of the risk. |
📌
Step1-Access the Project Canvas
1. Access Project Backlog
-
Via Project Studio
Or
Navigate to:Project > Develop > Project Studio -
Via Project Office
Expand the Project Backlog panel within the Project Office workspace.
The Project Backlog gives you a centralized view of all your projects, including their current status.
2- Open the Project Canvas
- In the Project Backlog, click Edit icon
 next to the desired project to open its Project Canvas.
Step2-Access the Risk Management Studio
1. In the Project Canvas, go to the Manage section.In the Risk Management panel, you’ll find a summary of current project risks :
-
Total Risks
-
Low Impact Risks
-
High Impact Risks
-
Resolved Risks
- Owned Risk
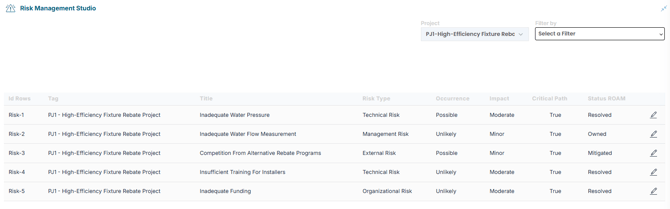
2. Expand "Risk Management " to view, add, or manage project risks in "the Risk Management Studio".
📌Add a new Project Risk
- Click
 to open the "Creat Risk" Dialog Box and complete the following fields.
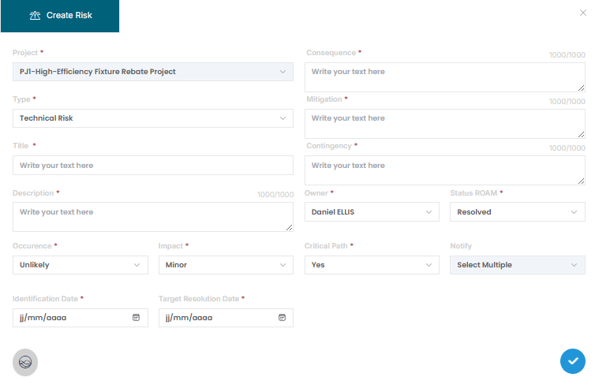
| Field | Description |
|---|---|
| Type | Select from: Technical, Organizational , Management External Risk |
| Title & Description | Provide a clear name and detailed explanation of the risk |
| Occurrence | Select likelihood: Unlikely, Possible, or Likely |
| Impact |
Rate severity: Minor, Moderate, or Major |
| Identification Date | Date the risk was identified |
| Target Resolution Date | Deadline for resolving or mitigating the risk |
| Consequence | Describe what may happen if the risk occurs |
| Mitigation | Outline steps to proactively reduce the risk |
| Contingency | Define the fallback plan if the risk materializes |
| Owner | Assign a team member responsible for tracking the risk |
| ROAM Status | Choose: Resolved, Owned, Accepted, or Mitigated |
| Critical Path | Indicate if the risk impacts the project's critical path (Yes / No) |
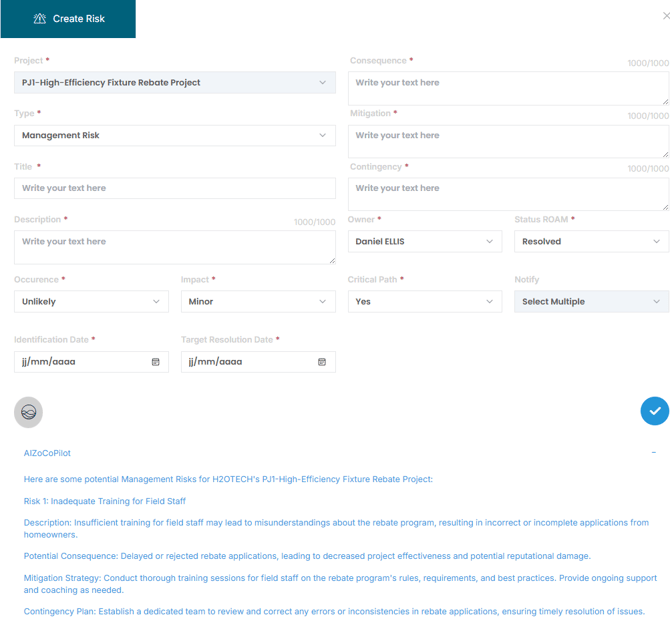
💡Tip : Use AIZO to Add or Refine a Risk
Simply activate AIZO and select the Risk type to receive intelligent suggestions for descriptions, mitigation, and contingency plans—tailored to your project context.
✏️Manage an Existing Risk
You can edit, update, and track risks at any time:
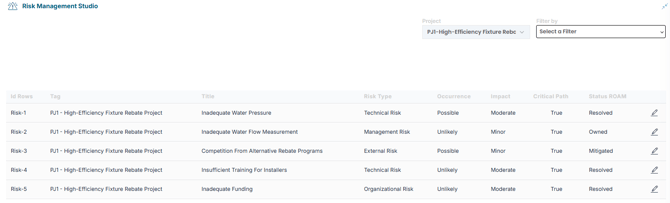
- Apply filters if needed (Occurrence, Impact, ROAM Status) to find the risk faster.
- Click “Edit” on the risk you want to update
- Modify fields such as ROAM status
- Click
 to save your changes
✅Summary
By using the Risk Management Studio within the Project Canvas, teams can systematically document, monitor, and reduce risks that could impact delivery. Leveraging the ROAM model and AIZO ensures a consistent and proactive approach to risk management throughout the project lifecycle.